
When working with model driven apps, we have the ability to navigate through the flow of the record using the Business Process Flow. The BPF is a great way to navigate through the different stages of the record, but what if that is just not enough. What if in order to complete the record I have to go through 10 or maybe more stages.
In previous work that I did, we implement logic that allowed us to navigate by displaying a popup window on the form (using alert.js), and we called the logic inside an HTML eb resource. A lot of these options are being deprecated and we will be prevented from calling webapi calls using HTML web resources.
With the 2020 Wave 1 Release we can now incorporate the Xrm.Navigation.navigateTo command as well as the Xrm.Utility.lookupObjects to provide us similar functionality.
Our use case will be as follows. When a CDS user works on a record and wants to change the status of the record, they will be able to change the status only to statuses that are available (not to all statuses), and the system will log the history of status changes. There are various ways of implanting this, and I chose in this particular case the one that most fits our business model.
Let’s first start by creating the data elements that we need. We will use three entities, called Statuses, Status Mappings and Status History.
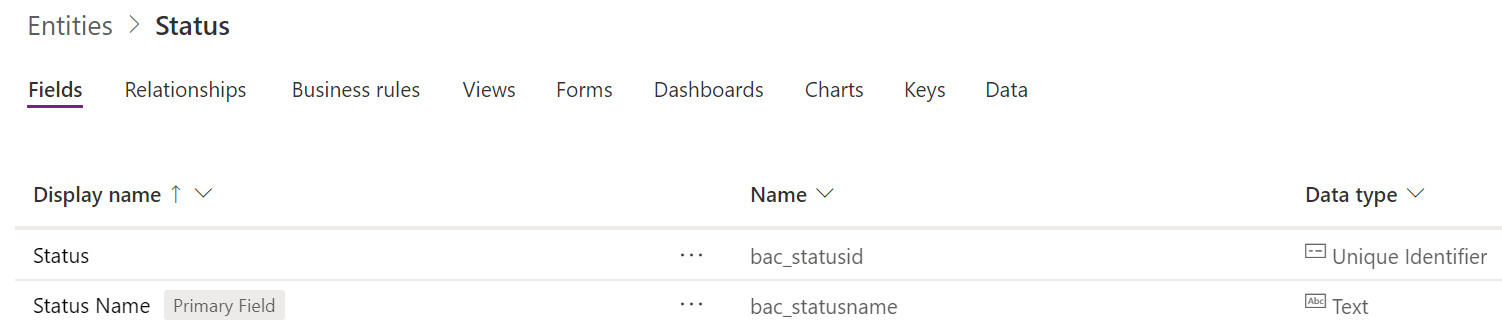
The Status entity will just contain a list of statuses with no particular logic, and will contain a single field called Status name as shown in the image below. I set the Ownership of this entity to Organization.
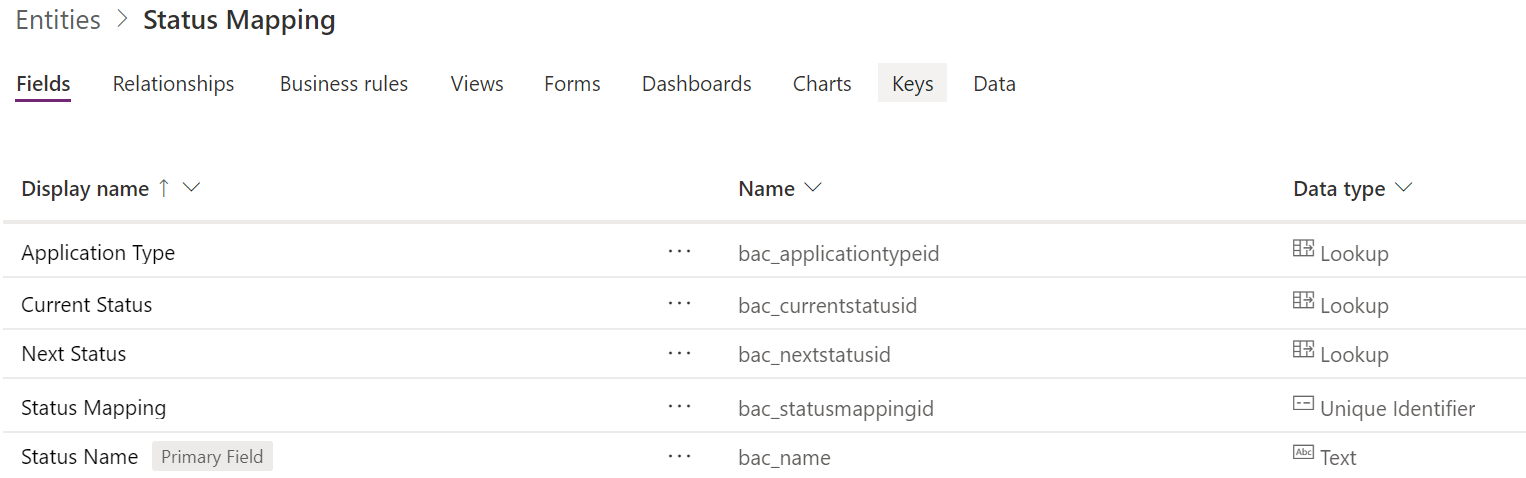
The Status Mapping entity will contain the mappings of the entity, and the abilities to navigate from one Status to another. This means that I will have the current status and the next status so that I can query this entity. Since I used this for applications, I also have an application type record. This entity can be set to have either type of ownership. If there are no security restrictions, then we can set to be organization owned, and if you need to implement Security or Sharing, you can set this to be User/Team owned. The image below shows the required fields for this entity.
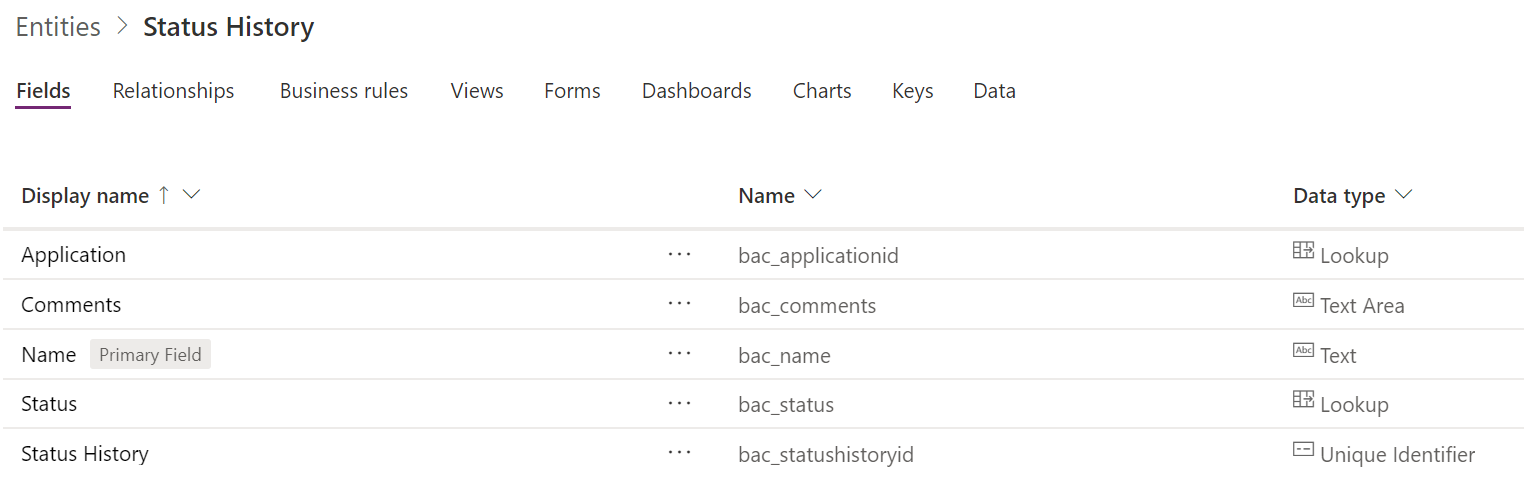
The last entity is the Status History. We also have an application entity which we will discuss later, but, that can be any entity that you desire. The Status Mapping entity will contain a history of your statuses as you move from one Status to another. This entity will contain a lookup to the parent entity (in our case Application), and a lookup to the Status entity. The ownership for this entity will be User/Team. The image below will show the basic fields for this entity.
In our application entity, we will also create a lookup to the Status entity, so that we can store the current status. This field will be read only so that users cannot make any changes to it directly, but only by going through the Change Status process.
The next thing that we will do is on the parent entity, in our case the Application entity, we will add a ribbon button called Change Status that will call a function in JavaScript to start the execution of this process. The image below shows the Change Status button in our Command bar on the application entity.

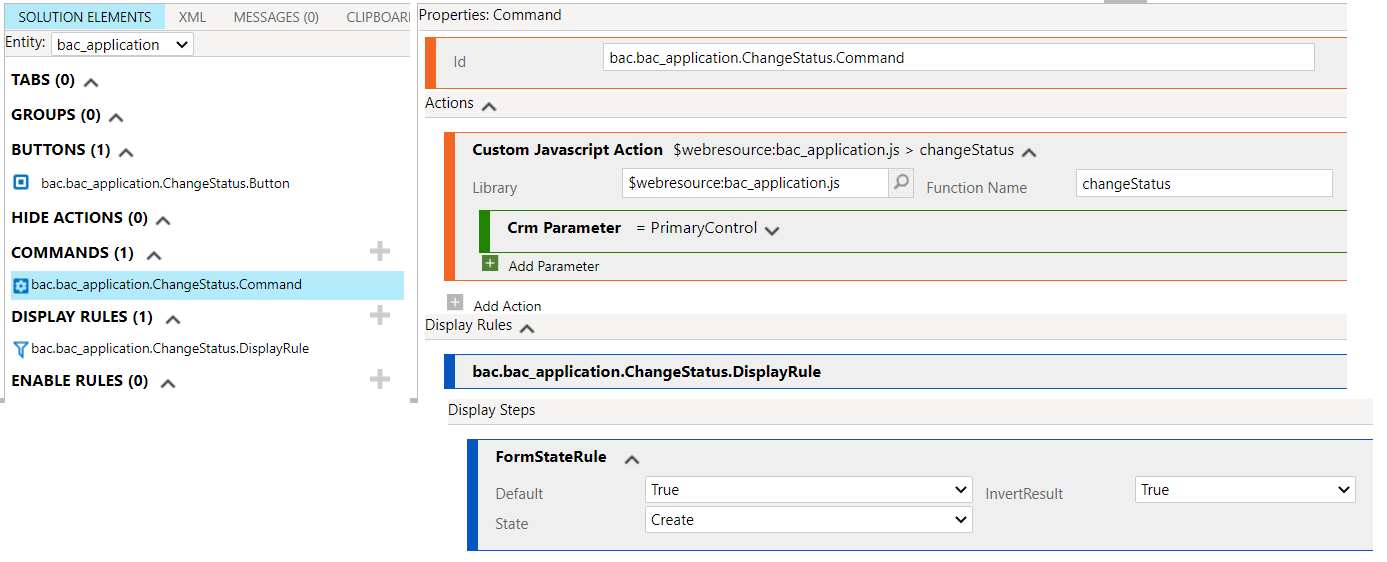
Using Ribbon Workbench, we create the button, add a Command that will use a Custom Javascript Action passing the Crm Parameter PrimaryControl, which will allow us to get the execution context for the function. We set the Display Rule as a Form State Rule to show everywhere except on Create.
The image below shows the configuration that we set in Ribbon Workbench. Thank your Scott Durow.
Next we will start working on the Change Status Javascript function in the application entity. This function is straight forward, but it took a little bit of trial and error to get the exact results that I was looking for.
Within the function I retrieve the current status and the application type and call the Xrm.Navigation.navigateTo function to pop up a new record window when the button is clicked, passing the application id, application type and current status as parameters.
The code below shows the change status function
 function changeStatus(context)
 {
   var entityId = context.data.entity.getId();

   var currentStatus = context.getAttribute("bac_applicationstatusid").getValue();
   var currentStatusId = currentStatus[0].id;

   var applicationType = context.getAttribute("bac_applicationtypeid").getValue();
   var applicationTypeId = applicationType[0].id;

   var entityFormOptions = {};
   entityFormOptions["entityName"] = "bac_statushistory";
   entityFormOptions["useQuickCreateForm"] = true;

   // Set default values for the Contact form
   var formParameters = {};
   formParameters["bac_applicationid"] = entityId;
   formParameters["bac_applicationidname"] = entityName;
   formParameters["bac_applicationidtype"] = "bac_application";
   formParameters["bac_name"] = applicationTypeId + ":" + currentStatusId;

   Xrm.Navigation.navigateTo({
       pageType: "entityrecord",
       entityName: "bac_statushistory",
       data: formParameters
     },
     {
       target: 2, //2 - to open record in modal dialog
       position: 2, //1 - dialog in center, 2 - side panel
       width: {
         value: 30,
         unit:"%"
       }
   }).then(function(result) {
     var reference = result.savedEntityReference;
   });
 }
Within the Status History form I add three functions, an onLoad function, a statusOnChange function and the setLookupOptions function.
The OnLoad function disables the name and status fields on the form, as these should not be modified by the user directly because we want to limit the available options that the user can select from. It verifies that this is a create form, and then calls the statusOnChange function.
 function onFormLoad(executionContext) {
   var formContext = executionContext.getFormContext();
   var formType = formContext.ui.getFormType();

   formContext.getControl("bac_status").setDisabled(true);
   formContext.getControl("bac_name").setDisabled(true);

   if (formType == 1)
     statusOnChange(executionContext);
 }
The statusOnChange function gets the Application Type and the Status from the parameters that were passed to the form (and temporarily placed in the name attribute control), and uses the Xrm.WebApi.retrieveMultipleRecords function to get all of the available “next” statuses for that type of application and that current status, and puts them in a Statuses array as key/value pair elements.
Once all elements have been added to the Statuses array, the function will call the setLookupOptions function.
 function statusOnChange(executionContext)
 {
   var formContext = executionContext.getFormContext();
   var nameControl = formContext.getControl("bac_name");

   var name = nameControl.getAttribute().getValue();
   nameControl.getAttribute().setValue("");
   var inputParams = name.split(":");
   var currentTypeId = inputParams[0];
   var currentStatusId = inputParams[1];

   // Call Web Api to get
   var statuses = [];
   var filter = "_bac_applicationtypeid_value eq " + currentTypeId + " and _bac_currentstatusid_value eq " + currentStatusId + " or _bac_currentstatusid_value eq null and statecode eq 0";
   Xrm.WebApi.retrieveMultipleRecords("bac_statusmapping", "?$select=bac_name,_bac_nextstatusid_value&$filter=" + filter).then(
     function success(result) {
       for (var i = 0; i < result.entities.length; i++) {
         var statusId = result.entities[i]["_bac_nextstatusid_value"];
         var statusName = result.entities[i]["_bac_nextstatusid_value@OData.Community.Display.V1.FormattedValue"];
         statuses.push({id: statusId,name: statusName});
       }
       // perform additional operations on retrieved records
       setLookupOptions(formContext, statuses);
     },
     function (error) {
       console.log(error.message);
       // handle error conditions
     }
   );
 }
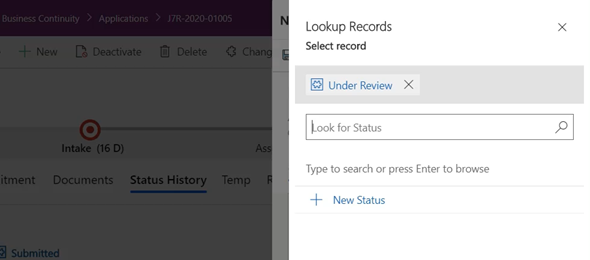
The setLookupOptions function uses Xrm.Utility.lookupObjects to populate in a Lookup window only the statuses that are available for the user to select. We set the lookup options to not allow multiple selections, disable the most recent items, and filter to show the correct statuses. When the user makes a selection that will be populate on the form (displayed in the panel). The user will then have a choice to enter a comment for that status if required.
 function setLookupOptions (formContext, statuses)
 {
   var lookupOptions = {};
   lookupOptions.allowMultiSelect = false;
   lookupOptions.disableMru = true;
   lookupOptions.defaultEntityType = "bac_status";
   lookupOptions.entityTypes = ["bac_status"];

   var fetchXml = "<filter type='or'>"
   statuses.forEach(function(status) {
     fetchXml += "<condition attribute='bac_statusname' operator='eq' value='" + status.name + "' />"
   });
   fetchXml += "</filter>";

   lookupOptions.filters = [{
           filterXml: fetchXml,
           entityLogicalName: "bac_status"
      }];

   Xrm.Utility.lookupObjects(lookupOptions)
   .then(function(result)
   {
     if (result != undefined && result.length > 0)
     {
       var selectedItem = result[0];
       formContext.getControl("bac_status").setDisabled(false);
       formContext.getControl("bac_name").setDisabled(false);

       formContext.getAttribute("bac_status").setValue([{ entityType: selectedItem.entityType, id: selectedItem.id, name: selectedItem.name }]);
       formContext.getAttribute("bac_name").setValue(selectedItem.name);

       formContext.getControl("bac_status").setDisabled(true);
       formContext.getControl("bac_name").setDisabled(true);

     }
   }, function(error)
   {
     alert(error.message);
   });
 }
After the function is saved, a Flow is executed on the Create record trigger to update the Status field on the parent application record.
The dynamics image below shows the process of how this looks after all the implementation is complete.
This particular logic can be customized for any business need when the Business Process Flow is not enough, when you need to implement security on who can make changes of statuses to your records, implement logic for field options and more. This is just the tip of the iceberg on how far this logic can be taken if it makes sense for your organization.