
Integrating Google Maps or Bing Maps with Microsoft Dynamics CRM is a requirement that we often come across.
This blog will demonstrate how to add a new button to the CRM account entity and when clicked it will display the map of the address in a new browser window.
Integrating Google Maps or Bing Maps with Microsoft Dynamics CRM is a requirement that we often come across.
This blog will demonstrate how to add a new button to the CRM account entity and when clicked it will display the map of the address in a new browser window.
This example worked of course with CRM 4.0, but we would like to show you how to do this in CRM 2011 (can be implemented online or on-premise)
The first thing that we need is to do is find a 16×16 image and a 32×32 image to place on the ribbon, as well as create a javascript file and function that will open up the new window.
The following function will retrieve the fields from the account form and pop up a new window:
function showGoogleMap() {
// Get the values from the form

  var street1Field = Xrm.Page.data.entity.attributes.get("address1_line1");
  var cityField = Xrm.Page.data.entity.attributes.get("address1_city");
  var stateField = Xrm.Page.getAttribute("address1_stateorprovince");
  var postalField = Xrm.Page.data.entity.attributes.get("address1_postalcode");

  var address = street1Field.getValue();
  address = address + ', ' + cityField.getValue();
  address = address + ' ' + stateField.getValue();
  address = address + ' ' + stateField.getValue();
  address = address.replace(/ /g, "+");

  var url = 'http://maps.google.com/maps?f=q&source=s_q&hl=en&vps=1&jsv=156c';
  url = url + '&q=' + address;

  window.open(url);
}
Note that we are using the new Xrm.Page namespace in our Javascript function.
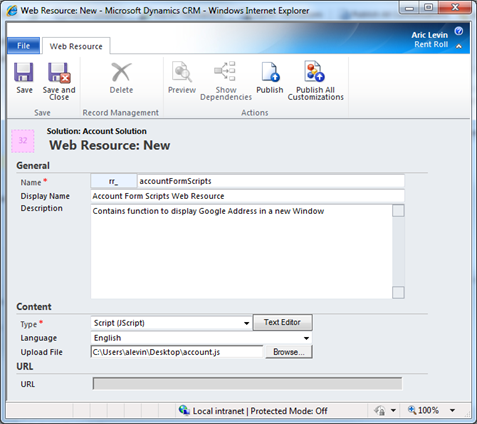
Now save the javascript file, and we will upload the files (Web Resources) to our CRM Server.
- In your CRM application, Click on Settings and then click on Solutions under the Customization section.
- Click on New to create a new Solution. In the popup window enter the Display Name, Name and Published:

- Save the Solution.
- Under Components -> Entities, click on Add Existing Entity, and add the account entity
- Click on Web Resources and add the javascript file
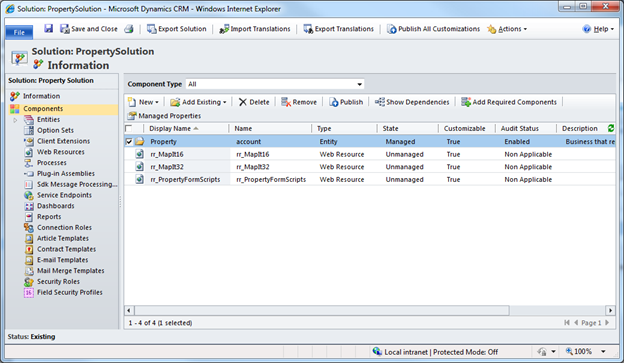
- Do the same for the two image files.
- When complete, your solution’s web resource should look something like this:
- Click on Publish All Customizations, and then Save and Close
The next step that we need to do is to modify the Customizations Xml file, so that the button appears on it and assign the images and scripts to the button. In order to do that we need to export the Solution, and modify it in an Xml Editor (or Notepad). In this case, we would recommend an Xml Editor.
-
In the Solutions Window, select the accountSolution Solution, and click on Export.
Since you already published your customizations, you can skip the first wizard page and click Next.- Click Next in the Export System Settings (Advanced) Page (do not check any of the boxes)
- For now, keep the Package Type as Unmanaged, and click Next
- Click on Export, Save the file and Extract the file.
- Open the customizations.xml file in Microsoft Visual Studio
Locate the RibbonDiffXml section and paste the following code on top of it:
<RibbonDiffXml>
  <CustomActions>
    <CustomAction Id="RentRoll.account.form.ShowMap.CustomAction" Location="Mscrm.Form.account.MainTab.Workflow.Controls._children" Sequence="268">
      <CommandUIDefinition>
        <Button Id="RentRoll.account.form.ShowMap.Button" Command="RentRoll.account.form.ShowMap.Command" LabelText="$LocLabels:RentRoll.account.ShowMap.LabelText"
ToolTipTitle="$LocLabels:RentRoll.account.ShowMap.LabelText" ToolTipDescription="$LocLabels:RentRoll.account.ShowMap.ToolTip"
TemplateAlias="o1" Image16by16="$webresource:rr_MapIt16" Image32by32="$webresource:rr_MapIt32" />
      </CommandUIDefinition>
    </CustomAction>
  </CustomActions>
  <Templates>
    <RibbonTemplates Id="Mscrm.Templates"></RibbonTemplates>
  </Templates>
  <CommandDefinitions>
    <CommandDefinition Id="RentRoll.account.form.ShowMap.Command">
      <EnableRules>
        <EnableRule Id="RentRoll.account.Clients.EnableRule"/>
        <EnableRule Id="RentRoll.account.form.FormStateNotNew.EnableRule"/>
      </EnableRules>
      <DisplayRules>
        <DisplayRule Id="RentRoll.account.form.FormStateNotNew.DisplayRule"/>
        <DisplayRule Id="RentRoll.account.Clients.DisplayRule"/>
      </DisplayRules>
      <Actions>
        <JavaScriptFunction Library="$webresource:rr_PropertyFormScripts.js" FunctionName="showGoogleMap" />
      </Actions>
    </CommandDefinition>
  </CommandDefinitions>
  <RuleDefinitions>
    <TabDisplayRules />
    <DisplayRules>
      <DisplayRule Id="RentRoll.account.form.FormStateNotNew.DisplayRule">
        <FormStateRule State="Create" InvertResult="true"/>
      </DisplayRule>
      <DisplayRule Id="RentRoll.account.Clients.DisplayRule">
        <CrmClientTypeRule Type="Web"/>
      </DisplayRule>
    </DisplayRules>
    <EnableRules>
      <EnableRule Id="RentRoll.account.Clients.EnableRule">
        <CrmClientTypeRule Type="Web"/>
      </EnableRule>
      <EnableRule Id="RentRoll.account.form.FormStateNotNew.EnableRule">
        <FormStateRule State="Create" InvertResult="true"/>
      </EnableRule>
    </EnableRules>
  </RuleDefinitions>
  <LocLabels>
    <LocLabel Id="RentRoll.account.ShowMap.LabelText">
      <Titles>
        <Title languagecode="1033" description="Show Google Map" />
      </Titles>
    </LocLabel>
    <LocLabel Id="RentRoll.account.ShowMap.ToolTip">
      <Titles>
        <Title languagecode="1033" description="Display a Google Map for the selected property" />
      </Titles>
    </LocLabel>
  </LocLabels>
</RibbonDiffXml>
Notes:
The prefix used in this sample is RentRoll, you can use a different prefix, but make sure that it matches all the way through
You can modify the above xml to better fit your needs.
Make sure that the web resource names match the names in the web resources section of the xml file
- Save the Xml file.
- Select all the files that you previously extracted, and zip them into a new file
-
In your CRM solutions Window, Click on Import
- In the wizard page click Browse…, and select the newly created zip file.
- Click Next a couple of times until the import is complete.
- When done, Publish All Customizations, and Close
The last step is to let the CRM account entity know to use the javascript file for the form events:
- Click on Workplace and under Customers select Accounts
- On the ribbon, click on the Customize Tab, and then click on Form
- Click on the Form Properties button
- In the Events Tab Add the javascript library to the form
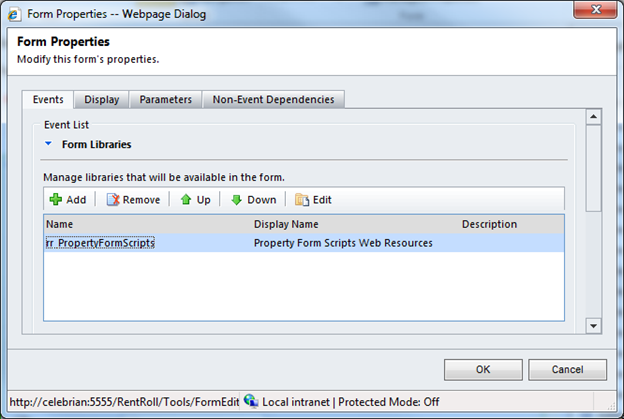
- Click OK
- Publish the Form, and click on Save and Close
Now is testing time.
Click on any of your accounts (or other entities) to open up the account form
You should see the Show Google Map button on the form.
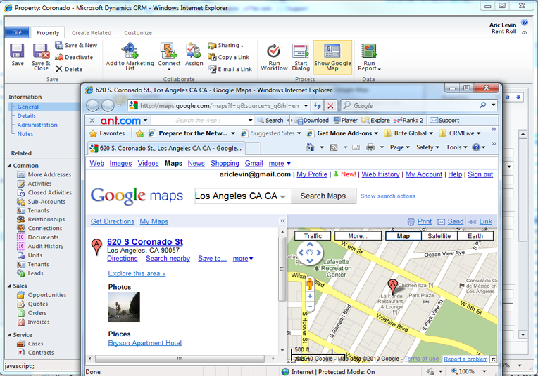
Click on the Show Google Map button, and a new window should open up with a map of the address on that form.
Good luck!!!