Recenly we received requests from clients and some questions from Dynamics Community members on how to Clone records. Although there are some available solutions out there, and the various possibilities on how to implement this, we would like to demonstrate here one possibly and not to complicated way on how to implement this. This implementation involved using Ribbon Workbench to create the Clone button and a Command that will execute a JavaScript function, which will call an action and execute Plugin/Action code to copy the record.
So the first step of course is using Ribbon Workbench to create the button, enable/display rules and the command. We start of by adding our entity that we want to customize to a new Unmanaged solution. We only need to add the entity, and not all of the components of the entity. Once we created the solution we open Ribbon Workbench, and select the new solution that we created.
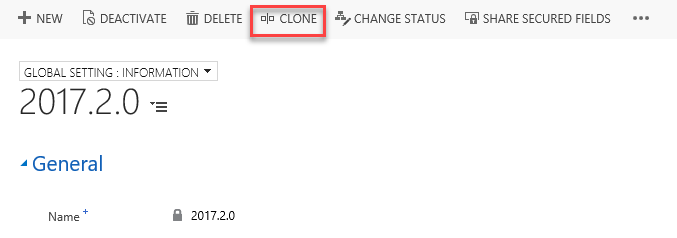
We can not add a new button with an image to the form command bar, as shown in the picture below:

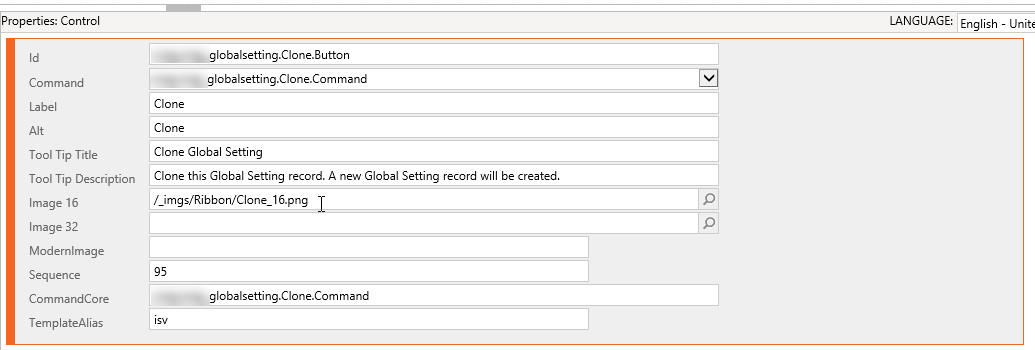
You should also add the Label, Alt, Tool Tip Text and Tool Tip Description. It is a good habit to have the Tooltip Description display a different text that the Tool Tip Text. We can now create the display rule. We created a simple display rule only with a FormStateRule that has a State of Existing. This means that the Clone Command will only be available for records that already exist in the System, but not for newly or disabled records. You can change the display rule, as you wish.
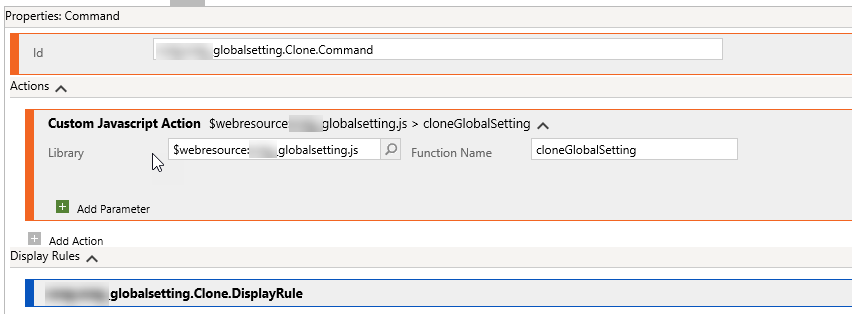
Once we have the display rule, we will create the command. You should have a JavaScript Library in place for your entity that you wish to clone ahead of time, so that you can use it for the Command. You can also use a Global library if you are planning to use the same logic for multiple entities. In the command we will Create a Custom JavaScript action and specify the name of the library and function that will be used when the Clone Command Bar button is clicked (shown is the image below).
Let’s go ahead and look at the finalized button properties before publishing the solution changes.
We can now click on the Publish button in Ribbon Workbench to finish adding the button to our form. The next step is to add the JavaScript code to our library that we previously created. There are a few ways of calling actions from JavaScript, but we prefer to use the process.js JavaScript Library. This library can be downloaded from github, and is available here: https://github.com/PaulNieuwelaar/processjs. Add this library to your form where you added the Clone button to, so that you can use it in your JavaScript Library.
function cloneGlobalSetting()
{
    var entityId = Xrm.Page.data.entity.getId();
    var entityName = "new_globalsetting";
    var messageName = "new_CloneGlobalSetting";
    var success = callCloneAction(entityId, entityName, messageName);
    if (success) {
        Xrm.Page.ui.setFormNotification("Record has submitted for cloning.", "INFO", "GEN")
        setTimeout(function () {
            reloadPage(entityId);
        }, 3000);
    }
}
The above function calls the callCloneAction, and passes the Guid of the entity record, the name of the entity and the name of the SDK message that will be created. The below code snippets show the callCloneAction and callProcessAction functions. Although these can be combined into one, we separated them, since we have multiple function calls to Actions in our code, and use the callProcessAction for multiple purposes. If you only have one call to callProcessAction, you can keep it separate, or add it to your global script library to be used across multiple entities.
function callCloneAction(entityId, entityName, messageName, name) {

    var inputParams =
        [
            {
                key: "Target",
                type: Process.Type.EntityReference,
                value: new Process.EntityReference(entityName, entityId)
            }
        ];
    var success = callProcessAction(entityId, entityName, messageName, inputParams);
    return success;
}

function callProcessAction(entityId, entityName, messageName, inputParams) {
    var success = true;
    Process.callAction(messageName, inputParams,
    function (params) {
        // Success
        var result = "";
        for (var i = 0; i < params.length; i++) {
            result = params[i].key + "=" + params[i].value + ";";
        }
        // alert(result);
        success = true;
    },
    function (e, t) {
        // Error
        success = false;
        alert(e);

        if (window.console && console.error)
            console.error(e + "n" + t);
    }
    );
    return success;
}
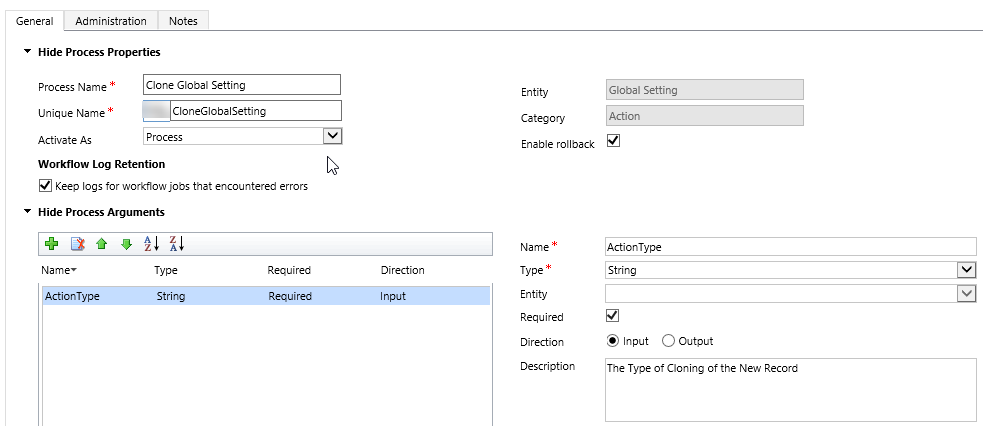
Now that we have added our JavaScript code to our library, we need to upload and publish this file, as well as add it to the form. Once that is done, we need to create the Action Process in our solution. We do this by navigating to Settings -> Processes and Creating a New Action. The screenshot below shows the Action Process that we created. Note that there is a parameter called Action Type, which is not required for this particular case, but is used for our cloning process, since the record can be cloned in a few different ways.
We now have to add the Plugin/Action code and register it. The first thing to do is create a new plugin. If this is the first time you are creating a new plugin, please follow the Microsoft MSDN article on how to create a Basic Plugin here. In our Plugin project, we created two classes, although this can be done with one. The first class shown below is just the entry point which calls the actual class that processes the action.
    public class GlobalSetting : Plugin
    {
        public GlobalSetting()
            : base(typeof(GlobalSetting))
        {
            this.RegisteredEvents.Add(new Tuple<int, string, string, Action<LocalPluginContext>>(40, "new_CloneGlobalSetting", "new_globalsetting", new Action<LocalPluginContext>(ExecutePostGlobalSettingClone)));
        }

        protected void ExecutePostGlobalSettingClone(LocalPluginContext localContext)
        {
            if (localContext == null)
            {
                throw new ArgumentNullException("localContext");
            }
            string entityName = localContext.PluginExecutionContext.PrimaryEntityName;
            Guid entityId = localContext.PluginExecutionContext.PrimaryEntityId;
            string actionType = localContext.PluginExecutionContext.InputParameters["ActionType"].ToString();


            ITracingService tracingService = localContext.TracingService;
            tracingService.Trace("Entered {0} Plugin Method", "ExecutePostGlobalSettingClone");

            using (GlobalSettingLogic logic = new GlobalSettingLogic(localContext.OrganizationService, localContext.TracingService))
            {
                logic.CloneGlobalSetting(entityName, entityId, actionType);
            }
        }
    }
In our second class (GlobalSettingLogic), which is only a class that hold the logic of the requirement we will add the following function:
        private Guid CloneGlobalSetting(Entity globalSetting)
        {
            Entity newGlobalSetting = new Entity(new_GlobalSetting.EntityLogicalName);

            foreach (KeyValuePair<String, Object> attribute in globalSetting.Attributes)
            {
                string attributeName = attribute.Key;
                object attributeValue = attribute.Value;

                switch (attributeName.ToLower())
                {
                    case "new_globalsettingid":
                        break;
                    case "new_name":
                        newGlobalSetting[attributeName] = attributeValue + " - Cloned";
                        break;
                    default:
                        newGlobalSetting[attributeName] = attributeValue;
                        break;
                }

            }

            try
            {
                Guid globalSettingId = service.Create(newGlobalSetting);
                return globalSettingId;
            }
            catch (FaultException<OrganizationServiceFault> ex)
            {
                throw new InvalidPluginExecutionException("An error occurred in the CloneGlobalSetting function of the plug-in.", ex);
            }
        }
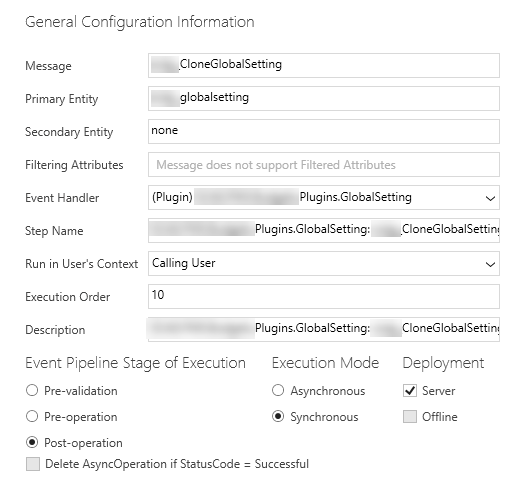
We now how to Build our Plugin, and deploy it using the Plugin Registration Tool (as shown in the following screenshot). The Action Process must have been completed prior to this step in order for it to appear as a Message in the Plugin Registration Tool.
Once the Plugin is registered, you are basically done. You can now test it out, and go to your form, click on the Clone button and a newly Cloned record can be created. The final form will look like this with the Clone button: